
Where the altar is and what it asks for
The DEVIL UNIONS panel is reached from the UNIONS button in the HUD. It opens on two tabs, ALTAR and UNIONS. The ALTAR tab names its own location in the first line: You stand at the altar in the Crystal Fields, north of Glimmerdeep. The heading under it is THE RIFTGLASS ALTAR, and the line under that states the trade: Beat the devil that answers and its Devil Form is yours.
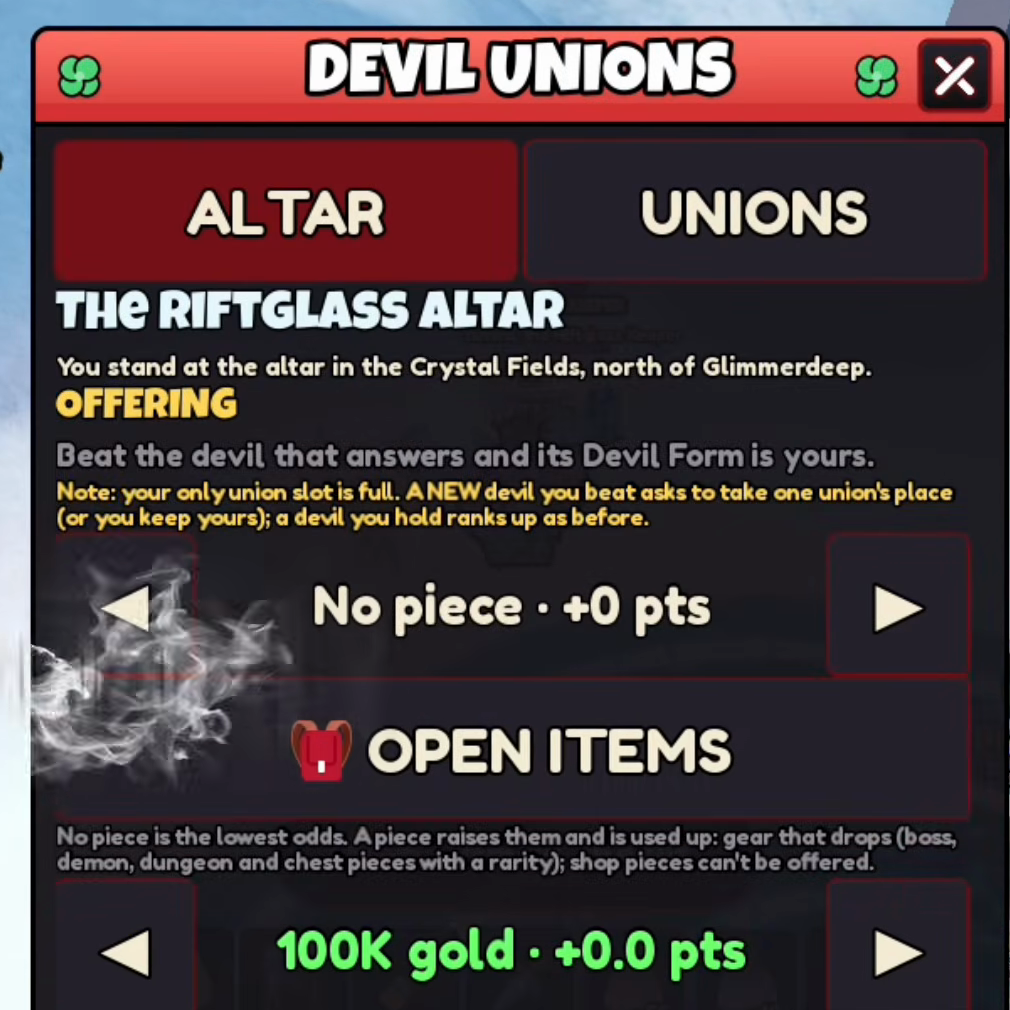
Between the location and the summon button sit four rows that the arrows step through: a gear piece, OPEN ITEMS, gold, and gems. The gold and gem rows print how much of each the account can put in — 1.07M gold and 33 Gems in this session — and both are steppers rather than fixed steps, because the same two rows printed 100K gold · +0.0 pts and 5 Gems · +0.0 pts a moment before they printed 770K gold · +1.1 pts and 28 Gems · +1.1 pts.
The rule for gear is printed under the OPEN ITEMS button: No piece is the lowest odds. A piece raises them and is used up: gear that drops (boss, demon, dungeon and chest pieces with a rarity); shop pieces can't be offered. So the thing you spend is a real drop, it leaves your inventory, and anything bought from the shop is refused. A checkbox above the steppers handles the edge case: You WEAR your only one: tap to allow offering it — the game will not take a piece off your body unless you tick that.
The thirteen devils and the odds the altar prints
The altar settles a tier before it settles a devil, and it prints both numbers on one screen. With nothing offered the account in the recording read this:
| Tier | Rate the panel prints | Devils in it | Each one |
|---|---|---|---|
| Supreme | 0.03% | Kaleidra | — |
| Strong | 2.57% | Vaelgrim, Solvane, Nocthar | 0.86% |
| Medium | 10.40% | Prismara, Kharvok, Nhalis, Toxaris | 2.60% |
| Weak | 87.00% | Glintmaw, Rimeclaw, Vexling, Mossquill, Sootfang | 17.40% |
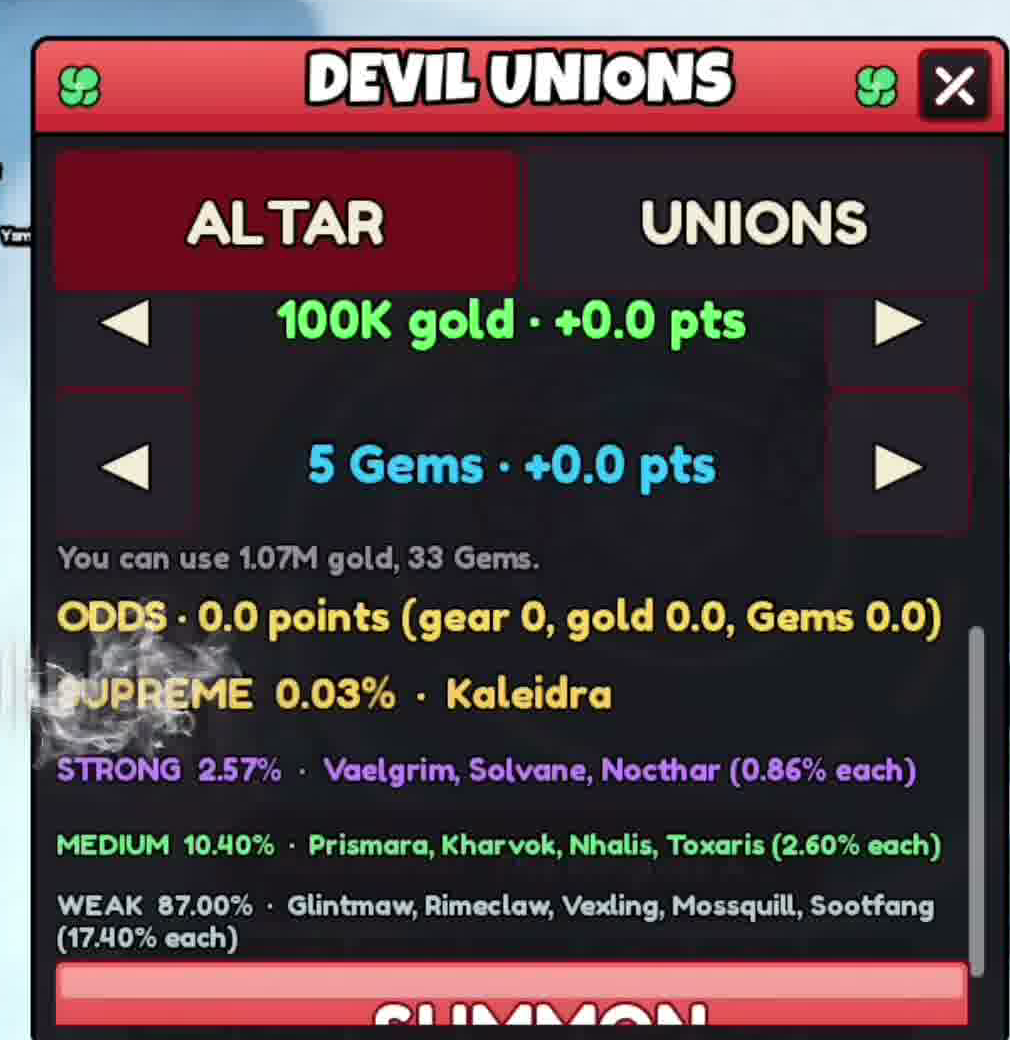
That is thirteen devils in four tiers, and the four tier figures add to exactly 100.00%. Read the tier line as the number the panel prints rather than as arithmetic you can rebuild from the per-devil rates: at these settings the three Strong devils multiply out to 2.58% against a printed 2.57%, while Medium (4 × 2.60%) and Weak (5 × 17.40%) land on their printed figures exactly. Both columns are the panel's own rounding.
The Supreme number is the one that decides whether a summon is worth the piece. At 0.03% the tier would average one summon in about 3,333; the other three tiers together account for 99.97%. A Weak devil is what you should expect to fight, and the recording did exactly that.
What an offering does to those odds
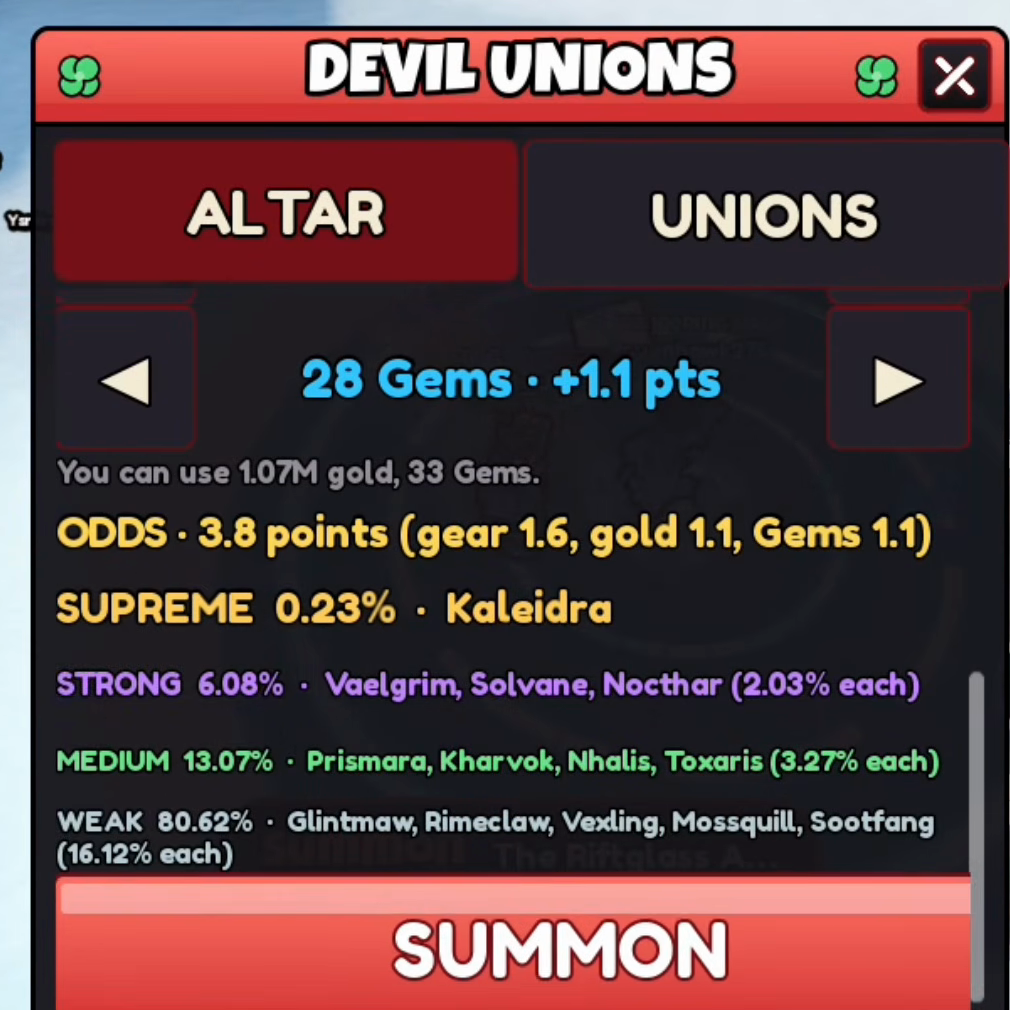
The useful part of this panel is that it shows the next summon's odds before you commit. In the same session the player built an offering out of three things — an Epic gear piece at +1.6 pts (x1), 770K gold · +1.1 pts and 28 Gems · +1.1 pts — and the ODDS line reported it back as ODDS · 3.8 points (gear 1.6, gold 1.1, Gems 1.1). The tiers moved with it:
| Tier | 0.0 points | 3.8 points | What changed |
|---|---|---|---|
| Supreme | 0.03% | 0.23% | About 7.7 times the rate, or one in 435 instead of one in 3,333 |
| Strong | 2.57% | 6.08% | Each Strong devil goes from 0.86% to 2.03% |
| Medium | 10.40% | 13.07% | Each Medium devil goes from 2.60% to 3.27% |
| Weak | 87.00% | 80.62% | Each Weak devil goes from 17.40% to 16.12% |
Where the points come from is printed on the gear grid behind OPEN ITEMS. Pieces carry their own badge: three cards read +6.5 (Choir Bell Pendant, Moonmare Signet, Kharzul's Ironfall Greaves) and the rest of the row read +1.6 (Deeproot Treads, Dawnspire Faulds and four more). When the player selected one, the altar row spelled out the label behind the number: Deeproot Treads · Epic · +1.6 pts (x1), and the same for Eclipse Ring · Epic · +1.6 pts (x1). The (x1) is a count, so the grid can hand over more than one copy of a piece.
Two limits matter for planning. First, the +6.5 cards were only read on the grid, never in the altar row, so their rarity label was not read; the two +1.6 pieces were both Epic. Second, the grid header states the trade plainly: The rarer the piece, the rarer the devil. It's used up. The panel never shows a points cap, and it does not say whether the gold and gems are consumed when the fight is lost.
The fight: one devil, ten minutes
Pressing SUMMON after an offering changes the button to a summary — CONFIRM: Eclipse Ring + 770K gold + 28 Gems — so you see the whole package once more before it is spent. The devil that answered the 3.8-point offering was Sootfang, the Ember Hound, the Weak-tier hound the altar puts at 17.40%:
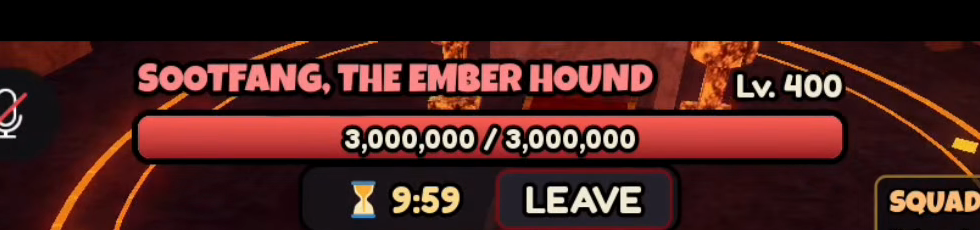
The health bar is the whole interface: name, level, current and maximum health, a ten-minute countdown and LEAVE. This one was Lv. 400 with 3,000,000 health. Leave and nothing is gained; win and the panel prints the submission line, which is also where the slot rule appears: Sootfang, the Ember Hound, submits, but your only union slot is full. Back at the altar you choose: swap it in for one of your unions, or keep yours.
Do not read 3,000,000 as the health of every devil. The recording summoned once and beat the Weak hound it drew; nothing here shows a Strong or Supreme fight, and the altar does not print a health value before you commit.
One slot, and what a second one costs
The slot rule is printed before you spend anything. On the altar, above the offering stepper, the panel warns: Note: your only union slot is full. A NEW devil you beat asks to take one union's place (or you keep yours); a devil you hold ranks up as before. Two consequences follow from that one sentence. A new form is a swap, not an addition, until a second slot exists. And a devil you already hold does not go through that swap at all: the note says a devil you hold ranks up as before, so beating one you own improves it in place rather than asking for a slot.
The store sells the other slots as five separate developer products, and each description names the free route it bypasses:
| Store product | Price | What its own description says |
|---|---|---|
| Devil Union Slot 2 | R$29 | Opens the 2nd slot "instead of after 10 devil wins: one more devil union, its form and its buffs active at once. Permanent, one-time." |
| Devil Union Slot 3 | R$59 | "instead of after 50 devil wins (slot 2 first)" |
| Devil Union Slot 4 | R$99 | "instead of after 100 devil wins (slot 3 first)" |
| Fifth Devil Union Slot | R$249 | "Opens your 5th Devil Union slot (Robux only; slot 4 first)" |
| Devil Union Slot 6 | R$499 | "Opens your 6th and last Devil Union slot (Robux only; slot 5 first)" |
Read the ordering as the real constraint: each slot requires the one before it, so buying slot 3 at R$59 without slot 2 does nothing. Buying all five costs R$935, and the last two alone cost R$748 with no free alternative in the store.
For most accounts the arithmetic is short. Slot 2 is R$29 and saves 10 devil wins, and 10 wins is a few sessions, so the purchase is a shortcut rather than a gate. Slots 5 and 6 are the only ones the game will not give you, and they buy a fourth and fifth form active at the same time — worth it only once one form has proven good. The buying-order guide puts these five against the rest of the store.
What a form does in the fight
Winning gives you a body and a skill. The recording's form was Sootfang's, and the game announced it in stages across the next minute:
Cinder Bite grew: form level 1/60. It lasts 15 s from the next taking on.CINDER BITE! (10 s) Your hits leave embers that keep burning.Cinder Bite fades. It rests 2:30; your other forms can still be taken.
Three things are printed there and worth separating. The form is activated rather than always-on, with a 15-second duration. Its skill is a damage-over-time that leaves burning embers, and the buff readout counted the active window down at 10 seconds while the remaining cooldown was 2:30. And the form carries a level of its own, 1/60, which is the same shape as the clan and bloodline ladders — but the panel does not say what raises it.
The player's appearance changed with the form, which is why the union is worth reading as a cosmetic decision as well as a combat one: whatever a devil looks like is what other players see while the form is active.
What these recordings do not settle
- Whether the gold and gems you offer are spent when the fight is lost, or only the gear piece. The panel says the piece is used up and says nothing about the other two rows.
- Whether the points are linear. One offering of 3.8 points was read; the panel never shows a maximum, so the shape of the curve between 0 and 3.8 is unknown.
- How form level climbs from 1/60, and what a level buys. No second level was observed.
- What the UNIONS tab lists. It was never opened in the recording, so the panel that manages held forms is undocumented here.
- Whether the summon can be repeated immediately after LEAVE, and whether leaving refunds the offering.
- The rarity behind the +6.5 gear cards. Only the two +1.6 cards were opened in the altar row, and both printed Epic.